
Most of the widely used free "standard" implementations of LOGO (like UCBLogo and MSWLogo) don't make creating animation very easy. It can be done, but one has to take care of "manually" erasing parts of images that are changing from frame to frame. In this paper we will show how to create little self contained animations, which can be run in image viewing programs and even put into Web pages. We will also discuss some of the possibilities offered by these new tools and techniques.
We will use our tools to explain how the construction of the famous Koch snowflake curve can be visualized.
Describing it "the usual way" in LOGOspeak would work like this: draw an equilateral triangle, and then put an equilateral triangle in the middle of each of the line segments forming the original triangle.
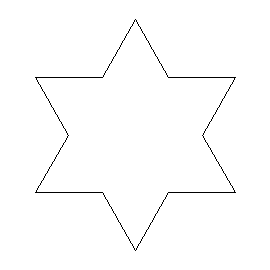
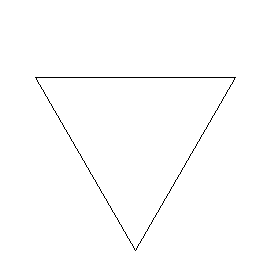
Before and after images look like this:
Before
After
For didactical purposes it can be very useful to have the change of the first shape into the second shape happening "in place", or expressed differently, as a slide show, like this

So, in the next part of the paper we will discuss the technical requirements and tools to create slide shows with Logo.
In MSWLogo (available from http://www.softronix.com or http://www.eurologo.org), it is possible to save a user selectable area of the graphics screen as a bitmap. The relevant commands are
SETACTIVEAREA
and
BITSAVE
We will use these commands to create 5 images of the snowflake curve and save the images as separate bitmaps.
But before we go into the details of how to create the animation, we take a look at the program creating the slides or frames of our show or movie.
Here is the code we use for drawing a Koch snowflake.
to flake :s :d

repeat 3 [koch :s :d rt 120]

end
to koch :s :d

if :d = 1 [ fd :s stop]

koch :s / 3 :d - 1

lt 60

koch :s / 3 :d - 1

rt 120

koch :s / 3 :d - 1

lt 60

koch :s / 3 :d - 1

end
Since this is a well-known example of a recursive curve -
especially in the LOGO community - we need not go into details on
the inner workings of the algorithm. We only need to know that :s
is a size parameter, namely the length of one side of the
original triangle, and :d is the recursion depth. So
flake 100 1 just draws an equilateral triangle with
a side length of 100, and flake 100 2 draws a star
with six rays.
We will use the following procedure to create our series of slides.
to kochdraw :n

setactivearea [ -135 -20 135 250]

repeat :n + 1 [ ~

cs lt 30 ~

flake 200 repcount ~

bitsave (word "flak repcount ".bmp) ~

]

end
Let us analyze this procedure step by step.
setactivearea is used to define the region
of the graphics screen which will be saved as a bitmap
file.cs simply clears the screen. lt 30 is there to make the "star"
stand on one of its rays. flake 200 repcount creates the image with
recursion depth repcount.repcount is a
function returning the "pass number" of a
repeat loop while the loop is executed. bitsave (word "flak repcount ".bmp)
writes out the bitmap files, and it uses the repeat count
to create unique file names for all the images.The ~-character is the line continuation
character in many Logo dialects. It is used here to make the code
more readable by breaking the long command sequence inside the
repeat loop into a few lines.
When this procedure is run, it creates a series of bitmap files flak1.bmp, flak2.bmp ... is created, and these files are the frames of our movie. In MSWLogo, these files are BMP-files, which is the standard windows bitmap format. To create GIF-animation, we have to convert these files into single bitmaps. This problem is not specific to Windows and BMP. GIF is not a native bitmap format for many computing environments, and therefore many programs, including LOGO versions on other platforms, like the Macintosh, will not offer the choice of saving the images as GIF files directly from the program. Therefore, the first additional tool we need is a file conversion program able to convert the native bitmap format of the environment we are using to GIF. Since at the moment GIF is the de facto standard for images on the WWW, conversion tools targeting GIF are available for all the common computer platforms.
In Windows, Microsoft Photo Editor, which comes with Office 97 is one of the programs offering this conversion facility, but there are many other freeware and shareware programs performing the same task.
After converting our images to GIF files we need to assemble our movie. Again, there are many tools for achieving this. Microsoft GIF animator can be downloaded for free from Microsoft's Web site (http://www.microsoft.com), and another well known program (in the Windows world) is GIF construction set, which is shareware. These programs allow importing a sequence of GIF images and turning them into a movie. The intervals each image is shown can be set in 1/100 of a second, and the movie can be set to loop mode either with a finite number of loops to infinite looping mode. This newly assembled movie can be saved as a GIF file, and this GIF file will be displayed in animation mode in programs able to handle this mode. The two most important programs for doing this are Netscape Navigator (version 3 or higher) and Microsoft Internet Explorer. Therefore, the vast majority of Web browsers in use can display our animated shows.
Two main areas of possible applications come to mind, animated exhibits and explanatory sequences.
When children are working with Logo, they want to show their products to their friends, parents, and other relatives. Up until now, they could not make animated sequences accessible in places without computers and the "correct version of Logo" installed. Now they can put their results on the Web and make them accessible to anybody with a standard Web browser.
Newer dialects of Logo (for example Superlogo) offer animation as part of the system, but the whole environment is needed to run the animation. The GIF animation solution offers the advantage of a much higher degree of portability.
On the other hand, we all have seen that animated display of algorithms can be very helpful. The Koch snowflake curve used as the example in this paper can be understood much more easily when animation is used to shown the successive steps of recursion.
The GIF approach to animation has the advantage of being extremely portable and widely usable, but it also has its shortcomings. Probably the most annoying problems is that it is not possible to make a movie start running in the Web browser only when the user performs some action like clicking with the mouse. The GIF animation standard includes this possibility, but current web browsers do not support this feature. Therefore, if an animated GIF image is put directly in a Web page, the movie will start immediately when the Web page has finished loading. In many didactical situations, this is "giving away knowledge" too early. But there is a workaround. ThE current generation of Web browsers supports an embedded programming language, JavaScript, and this tool can be used to display the first frame of a movie until the user clicks on the image, and only then the movie is started.
Here is a short example of code demonstrating how it can be done.
At the beginning of the <body> part of the HTML document we need the following piece of JavaScript code:
<script language="javascript">

firstframe = new Image(270,270)

firstframe.src="first.gif"

fullmovie = new Image(270,270)

fullmovie.src="full.gif"


function jolt (imageID,objectName) {

document.images[imageID].src = eval(objectName +
".src");

}


</script>
This piece of code assumes that first.gif is the
first frame of our movie as a separate file, and that full.gif
is the full movie. For using the technique we are about to
demonstrate, the movie should be in infinite loop mode.
At the place in our HTML document where we want the movie to be embedded, we insert the following piece of HTML code:
<center>

<A href=""

onMouseOver="window.status='Click on image to run movie';
return true"

onMouseOut="jolt('firstframe','firstframe');window.status='';
return true"

onClick="jolt('firstframe','fullmovie');return
false">

<IMG SRC="first.gif" NAME="firstframe"
height=270 width=270 BORDER=0>

</A>

</center>
This piece of code is somewhat tricky. We have to use an <a
..> tag since only this kind of tag allows the mouse
related actions upon touching or clicking the image. The window.status
message makes the browser display the associated text in
the status line of the window when the mouse is moved over the
image, thereby offering the user a hint that the image can be
animated. The onClick property essentially starts
the movie when the first frame image is clicked. The onMouseOut
property sets things back to original state when the mouse is
moved away from the image, and it even makes the movie stop when
he mouse leaves the image area.
This method still has one very noticeable shortcoming: when the first frame is clicked the movie does not start with this frame and the go on to the second frame and so on. Instead, it starts with a more or less unpredictable frame and then loops through the series of images. What really is happening is that the movie already is running "behind the first frame" and when the displayed first frame is clicked, the images just switches over to the currently displayed frame of the running movie. At the moment, this problem cannot be solved in an easy way by using only JavaScript. Hopefully, the next generation of We browsers will implement the full standard for animated GIF files, allowing animation start by user action like many video formats in use on the Web already do. When one is designing animation with our technique, one has to keep in mind that we do not start a movie, but we uncover a screen with a continuously running movie in loop mode. Nevertheless, what this allows us is to implement a minimalist approach to animation, which can be displayed in almost any Web browser.
Here is this example worked "in real life":
Here is the code to produce the necessary images.
to kochenv :s :d :stepnum

local "runcount

make "runcount :stepnum

kochsteps :s :d

end


to kochsteps :s :d

if :d = 0 [ fd :s stop]

if :d = 1 [make "stepnum :stepnum - 1]

if and (:d = 1) (:stepnum <0) [ fd :s stop]
 kochsteps :s / 3 :d - 1

lt 60

kochsteps :s / 3 :d - 1

rt 120

kochsteps :s / 3 :d - 1

lt 60

kochsteps :s / 3 :d - 1

end


to steps :level

setactivearea [ -10 -10 210 70 ]

cs

rt 90

repeat (power 4 (:level - 1)) + 1 [~

cs rt 90 kochenv 200 :level repcount - 1 ~

bitsave (word "k 10000 * :level + repcount ".bmp) ~

print (word "k 10000 * :level + repcount)]

end
Running
steps 1produces the images for the movie above.
steps 2
steps 3
The author wishes to thank Olga Tuzova and Yehuda Katz who started the discussion about GIF animation in LOGO on the LOGO-L mailing list and published the first examples, giving the idea to demonstrate the technique to a wider audience. And enhance it by the use of JavaScript.